Thought I'd share what I learned when I adjusted the valves on my '81 FI so someone else can avoid my mistakes.
1. Buy the correct tool from one of the vendors (I got mine from AutoRicambi: http://www.autoricambi.us/product/CH0-0 ... ting-Tool/) - you'll need it. Also, buy a micrometer that measures to hundredths-of-a-millimeter (thousandths-of-an-inch). You'll need that to check the width of the old valve shims, which you need to know in order to figure out the size of the needed new shims.
2. Remove the intake plenum bolts so you can slide the intake valve cover off. You don't need to take the plenum off completely.
3. Don't be lazy! Drain and remove the radiator so you can use the crank pulley nut to rotate the engine. It'll make your life a lot easier in the end. Trust me, you'll be glad you did.
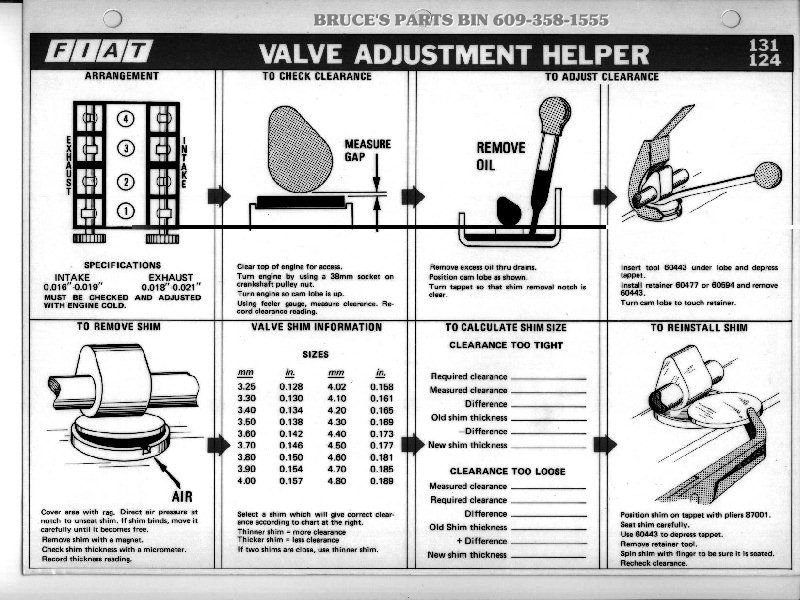
4. Turn the engine clockwise (duh!) The manual says to use a special tool to depress the valve (see instructions guide below) so you can slide the valve hold-down tool between the cam lobe and the valve. Good luck finding one. I know there's a thread here somewhere on how to make your own tool, but I didn't. I simply rotated the engine anti-clockwise just enough to remove the valve hold-down tool.
5. Now, I know you are not supposed to rotate the engine anti-clockwise, but I was stupid and did it anyway. If you turn the engine anti-clockwise too much as I did ('cos I'm an idiot!), you'll end up throwing the cams and crank out of correct alignment (the timing belt will stretch and slip) and need to install a new timing belt.... as I did
6. Given the way the valves are timed, you can work from intake to exhaust sides with each partial rotation of the engine
7. Double-check the gaps between the lobe and the valve shim before you order / install the new shims and after you install the new shims. Calculate the required shims correctly, and triple-check your calculations. I triple-checked my workings twice and still managed to mess it up on two valves.
8. Measure the gaps against the backside of the cam lobes... not the sides.
9. An air compressor with a pointed nozzle is a Godsend for getting the old shims out. Just make sure you siphon off as much oil as possible out of the valve housing or it will end up all over the place. Wear safety glasses.
After adjusting the valves, I found the car idled more strongly and had more power. The inconsistent idle was reduced significantly.
In the past I have had an aversion to injector cleaning fluid, but I ran some through the vapour canister vacuum hose after the valves (and the timing belt) were fixed. The amount of white smoke was embarrassing and pissed off my neighbours, but the engine is now idling perfectly.
]
What I learned when adjusting the valves
- KidDingo
- Posts: 174
- Joined: Wed Oct 12, 2011 7:32 pm
- Your car is a: 1981 Fiat Spider 2000 FI 5-spd
- Location: Edmonton, AB, Canada
What I learned when adjusting the valves
Last edited by KidDingo on Thu May 22, 2014 10:58 am, edited 1 time in total.
_______________________________________________
Michael
1981 Fiat Spider 2000 FI
Michael
1981 Fiat Spider 2000 FI
-
- Patron 2019
- Posts: 620
- Joined: Sun May 16, 2010 4:43 pm
- Your car is a: 1981 Spider 2000
- Location: Detroit Area
Re: What I learned when adjusting the valves
Nice suggestions......a magnet on a wand works nicely for removing the shims. Also, here is link to a Microsoft Excel spreadsheet to help with shim calculation. It may be confusing, but if you see the formulas it will make sense. https://app.box.com/s/o6bukc3wn6cbyef36bje
Current 81 Spider 2000
Previous 76 Spider
Previous 76 Spider
- RRoller123
- Patron 2020
- Posts: 8179
- Joined: Sun Nov 13, 2011 2:04 pm
- Your car is a: 1980 FI SPIDER 2000
- Location: SAGAMORE BEACH, MA USA
Re: What I learned when adjusting the valves
Nice write up and will be helpful to the folks here. You might want to add that you can rotate the slot on the shim holder so you can get at it from the right angle.
'80 FI Spider 2000
'74 and '79 X1/9 (past)
'75 BMW R75/6
2011 Chevy Malibu (daily driver)
2010 Chevy Silverado 2500HD Ext Cab 4WD/STD BED
2002 Edgewater 175CC 80HP 4-Stroke Yamaha
2003 Jaguar XK8
2003 Jaguar XKR
2021 Jayco 22RB
2019 Bianchi Torino Bicycle
'74 and '79 X1/9 (past)
'75 BMW R75/6
2011 Chevy Malibu (daily driver)
2010 Chevy Silverado 2500HD Ext Cab 4WD/STD BED
2002 Edgewater 175CC 80HP 4-Stroke Yamaha
2003 Jaguar XK8
2003 Jaguar XKR
2021 Jayco 22RB
2019 Bianchi Torino Bicycle
- KidDingo
- Posts: 174
- Joined: Wed Oct 12, 2011 7:32 pm
- Your car is a: 1981 Fiat Spider 2000 FI 5-spd
- Location: Edmonton, AB, Canada
Re: What I learned when adjusting the valves
i knew I was forgetting something.
Thanks guys.
Thanks guys.
_______________________________________________
Michael
1981 Fiat Spider 2000 FI
Michael
1981 Fiat Spider 2000 FI
-
- Patron 2019
- Posts: 143
- Joined: Mon Dec 12, 2011 6:10 pm
- Your car is a: 1979 124Spider
- Location: Mentor, Ohio 44060
Re: What I learned when adjusting the valves
I am confused why no one ever suggests using an electric remote starter switch to crank the engine for anything, including adjusting valve gap. It seemed to work fine for me.
Connect it between the alternator terminal and the coil/ignition wire {red one}. Disconnect the wire from the coil.
-
- Patron 2019
- Posts: 143
- Joined: Mon Dec 12, 2011 6:10 pm
- Your car is a: 1979 124Spider
- Location: Mentor, Ohio 44060
Re: What I learned when adjusting the valves
I misspoke. Connect the remote starter switch between the alternator and the small red wire running to the starter. Disconnect the small red wire from the starter.
The engine will crank without starting