More progress
-
bwilson27
Re: More progress
Well, I finally got my air plumbed into my garage properly, instead of running a hose through the door to my back porch, were my compressor is. I bought a HVLP spray gun, and bought 2 quarts of primer and a few other chemicals at a local auto paint store. The primer and chemicals alone set me back $215 bucks.
I've got everything sanded down and ready to go. I just need to clear out my garage, get some fans with filters, some brighter lights, drop cloths, etc, and a good respirator, and I'm ready to go.
I also welded in the side marker lights in, like you did.
I plan on doing the actual bodywork after it's all primed.
80% done, 70% to go!
- azruss
- Posts: 3659
- Joined: Sun May 30, 2010 12:24 pm
- Your car is a: 80 Fiat 2000 FI
Re: More progress
Dont know why you would waste all the expensive primer before body work. once you start pounding, filling, or welding all the primer will have to be removed from the affected areas.
-
bwilson27
Re: More progress
Epoxy primer, to seal the bare metal. My welding is done, and yeah, I'm going to put filler over the primer.azruss wrote:Dont know why you would waste all the expensive primer before body work. once you start pounding, filling, or welding all the primer will have to be removed from the affected areas.
Primer is PPG NCP271.
- azruss
- Posts: 3659
- Joined: Sun May 30, 2010 12:24 pm
- Your car is a: 80 Fiat 2000 FI
Re: More progress
make sure you rough up the area where you are using filler with at least 80 grit or rougher. If you have any more pounding to do, it will loosen the primer where you work the metal, so that primer has to go. I'm using Northstar epoxy primer and have been very impressed with its durability. Has great fill ability and very sandable.
-
bwilson27
Re: More progress
Yeah, my car has been sitting bare for almost a year. I continually have to re-sand it to get spots of surface rust that have been put there by hand prints, etc. I've studied everything I could for quite awhile now to prepare, and I get helpful directions from the manager of the auto paint store on Bell & 28th St.
I'll re-sand the whole thing once again with 80 grit and wipe it down with degreaser-waxer before priming it. Then, yeah, rough up the areas to be filled.
I don't have many dents that need to be pounded, I've already smoothed a lot of them.
I'll re-sand the whole thing once again with 80 grit and wipe it down with degreaser-waxer before priming it. Then, yeah, rough up the areas to be filled.
I don't have many dents that need to be pounded, I've already smoothed a lot of them.
-
azygoustoyou
Re: More progress
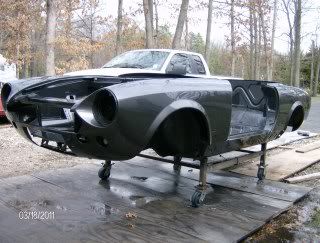
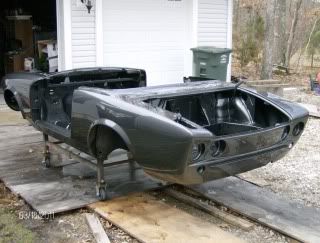
Woohooo! I finally was able to wash the car. One more warm day and I'll start putting some stuff on. 


- wachuko
- Posts: 1175
- Joined: Thu Feb 04, 2010 10:56 pm
- Your car is a: 1981 Fiat 2000 Spider
- Location: Orlando, FL USA
- Contact:
Re: More progress
The wait is killing me man! And it is not even my car, lol.
Looks awesome!
Looks awesome!
Drive Safe!
Wachuko
1981 Fiat Spider Progress thread
1967 912 Progress Thread
1981 911 SC Coupe RS Transformation
1983 911 SC Coupe RSR Transformation
1991 964 C4 Cabriolet Progress Thread
2012 BMW X5 xDrive35d
2015 FIAT Abarth
Wachuko
1981 Fiat Spider Progress thread
1967 912 Progress Thread
1981 911 SC Coupe RS Transformation
1983 911 SC Coupe RSR Transformation
1991 964 C4 Cabriolet Progress Thread
2012 BMW X5 xDrive35d
2015 FIAT Abarth
-
azygoustoyou
Re: More progress
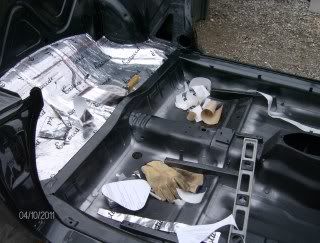
I just started back on it. I'm putting in the sound deadening. It's not that fun either. I didn't like how the frenched in fog lights look so I ordered some Harley Davidson front turn signals to put there. It will fill the hole and look a lot better than the fog lights. I'm not sure if I'll be able to use these lights. Figures something new just sitting around. I'll keep the updates coming. 

Last edited by azygoustoyou on Sun Apr 10, 2011 7:01 pm, edited 1 time in total.
-
bwilson27
Re: More progress
You mentioned that you had welded on the rear corner pieces- Won't it be difficult plumbing in the fuel filler pipe and hose now? I was gonna do this myself, until I considered that. Anyway, thanks for updating!
-
azygoustoyou
Re: More progress
Not at all. If you look under the back of the car you will see that you can still get your arm within that area. If you do weld those on, make sure you seal and coat the inside of the fenders really good. You won't be able to get to them after they are welded.
-
azygoustoyou
Re: More progress
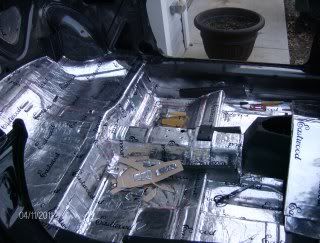
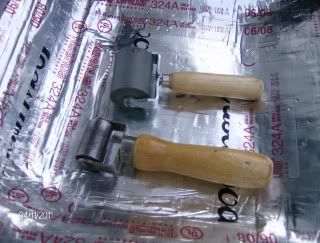
The second day is over and my fingers hurt.  But it's coming along. I bought two boxes of the Eastwood sound deadening for the car. You get nine sheets in each box. I used six sheets to get this far. It's looking good and is waterproof. I tried two different rollers. You definitely want a metal one. The plastic one doesn't work well. I also used a plastic handle off a dust brush to help in corners and hard to reach areas. It feels good to see some progress.


-
So Cal Mark
Re: More progress
it looks great, but if it's waterproof how will the water get out once the car fills up?
-
Fiat88
Re: More progress
When I did mine with Dynamat I found the roller next to the metal worked well. That was a fun project and then I used aluminum tape to seal the seams. Looks great!
-
azygoustoyou
Re: More progress
I did the same covering the seams. You can see the reddish lettering on the tape.